Aviation weather reports are nothing if not concise.
The benefit of this is that a large amount of information can be passed quickly. This morning I was having a flying lesson and I was listening to the radio conversations on the Cambridge Airport Approach frequency. A pilot over-flying the airport requested a METAR weather report. The controller was able to read the latest METAR to the pilot in about 20 seconds. The METAR contained the airfield identifier, date/time, surface wind speed/direction, visibility, a layered cloud report, temperature, relative humidity, barometric pressure and a significant weather report. That’s a lot of useful information passed in 20 seconds.
Here is an example of a METAR I just grabbed of the web.
It may look like gobbledygook-gook but that is jam packed with information. If you can bear it, let’s go through it one bit at a time. Explaining the format to you helps me learn, so try and pretend to listen.
Airfield Identifier (SCCI)
This is a globally unique code, every airfield is allocated an identification code by ICAO. In Europe the first letter in the code is always a E and in Great Britian the second letter is always a G. So for example Rothera is EGAR and Halley is EGAH. In South America the first letter is S and in Chile the second letter is a C. SCCI is the ICAO identifier code for Punta Arenas airport in Chile. So we know that this report is for Punta airfield.
Date/Time (2416:10Z )
The first 2 characters are the day of the month and the next 4 are the time in 24H format. The month and year are not included, they are assumed. The date/time is always in UTC which is know and Zulu time. This is what the Z at the end means. So we know from yesterdays blog post that local time in Punta is UTC-3 so this report was taken at 01:10pm local time of the 24th of September 2014(current month and year).
Wind (22002KT ) This is the wind direction in degrees magnetic (220) and the speed in knots (02). So we know that the surface wind is a gentle 2 knot wind from the South-West. Wind direction is always given in the direction that the wind is coming from.
Visibility (9999)
This is the horizontal visibility in metres. Anything over 10km is just reported as 9999 and typically read out as “all the nines” meaning more than 10km of horizontal visibility. 2000 for example would mean 2km. If a visibility is reported in miles it will be postfixed with SM for statute mile ( Eg. 3SM)
Weather
Any noteworthy current weather is mentioned in between Visibility and Cloud. This report does not include any weather codes. These are reported as 2 character long code . Some of the common codes are:
HZ – Haze
BR – Mist
FG – Fog
TS – Thunderstorm
CB – Cumulonimbus
SN – Snow
GS – Small soft hail
GR – Hail
PE – Ice pellets
IC – Ice crystals (diamond dust)
The intensity of the weather will be reported as one of the following three:
– Light
Moderate (no symbol)
+ Heavy
If there is neither a + or – then the intensity is moderate.
Cloud (SCT030 SCT200)
There are two cloud reports in this METAR which means there are two cloud layers. One low layer of scattered clouds at 3,000ft (SCT030)and a high layer of scatters cirrus at 20,000ft (SCT200). Scattered means that 3-4 oktas (eighths) of the sky is covered by the cloud layer
Temperature and Humidity (06/M01)
The first part of this section (06) tells us that the current temperature is a chilly 6 degrees Celsius at Punta. The second half (M01) is saying that the dew point is minus 1 degrees Celsius. The dew point being the temperature at which the air will become saturated. From this we know that the humidity of the air is 7 degrees away from reaching saturation point. When air reaches saturation point it releases water vapour and that makes clouds. Now very approximately the temperature drops 3 degrees for every 1000 feet of altitude gain. You can climb a big hill and check this. So if it is 6 degrees on the surface we would reckon that at about 2,300ft higher it would be -1. So 01/M01 would suggest there might be a cloud layer at about 2-3,000 feet. And hey looking back at the cloud report there is indeedy a SCT030 cloud report !
Pressure (Q0993)
This is the QNH which is a pressure measurement taken at the surface then adjusted to mean sea level to remove the airfield elevation. It is given in hector pascals and pilots can use this to calibrate their altimeters to ensure it show an accurate elevation in the current local atmospheric conditions. 1013hPa is considered a ‘normal’ QNH so 993hPa is quite low, it suggests that a low pressure system may well be in the area. So in addition to needing this to set the calibration sub-scale on their altimeters a pilot would probably also notice that it was kinda low and maybe frown.
Expected Variations or trends(NOSIG)
This section of the report highlights any expected significant variations. NOSIG means no significant trends expected in the next 2 hours. Other trend codes include:
BECMG – Becoming, meaning a permanent change is expected
TEMPO- Temporarily, meaning a temporary change lasting less than 1 hr is expected
NSW – No Significant Weather
NSC – No Significant Change
If BECMG or TEMPO are included then these will be followed by a codified message describing the change.
CAVOK
Some times the visibility, cloud report and weather section are replaced with the word CAVOK, which means ceiling and visibility OK. This substitution is only made if visibility is more than 10km, there is no cloud below 5,000ft and there is no significant weather. So CAVOK is good news for pilots hoping for conditions suitable for visual flying .
I have the perfect seat for undertaking my lessons on cloud classification. Straight out the back end of our studio I have a panoramic view of the sky and here on the Cambridgeshire Fens the clouds roll through much like they do at sea. It’s usually makes better watching than the TV.
Cloud Observation Seat
The Civil Aviation Authority and the Met Office appear to agree that there are ten types of cloud, plus a couple of bonus ones. I have been learning the two-letter codes for each of the ten cloud types and practising identifying them.
Clouds can be classified in terms of either their height or their form. The three heights are high (15,000′ to 30,000′), middle(6,000-15,000′) and low(below 6,000′). And the four forms of cloud are cirriform (fairy floss), cumuloform (cotton wool), stratiform(blanket) & nimbus (rain).
There are three high level clouds with a height between 15,000 and 30,000 feet to learn.
Ci – Cirrus clouds are whispy, silky, ghosty clouds high in the sky. Because they are so high in the sky they are made of ice crystals so tend to look very white. The height is high and the form is cirriform.
Cc – Cirrocumulus clouds are a bubbly semi-transparent film high in the sky. The film will typically be pocked, bubbled or rippled. The height is high and the form is cumuliform.
Cs – CirroStatus clouds are very high hazy, flat featureless blanket. The sun is usually visible through the film as a disk with a red fringed halo. The height is high and the form is stratiform.
There are two middle level clouds between 6,000 and 15,000 feet to learn.
Ac – Altocumulus clouds are like sheets of cotton wool balls fairly high in the sky. They tend to run in lines or waves. The globs may be separated or touching. The height is medium and the form is cumuliform.
As – Altostratus clouds are uniform blanket of greyish or bluish sheet, very slightly transparent usually enough to see the sun as a fuzzy bright white disc through. The height is medium and the form is stratiform.
There are 5 low level cloud types below 6,000 feet to learn.
Ns – Nimbostratus clouds appear as a darkish grey blanket covering the whole sky and thick enough to hide the sun. They are rain bearing. It may be a middle or low height cloud and the form is stratiform.
Sc – Stratocumulus clouds are a white or greyish sheet of lumps or rolls. Showery snow or rain may be associated with these clouds. These are what I see out my window today. They are a low level cloud that are cumuliform clouds that have formed into a stratus blanket.
St – Stratus clouds are the classic low greyish blanket so common in England. These clouds often produce a light drizzle of rain or snow. The height is low and the form is stratiform.
Cu – Cumulus clouds are the glamour cloud and most peoples favourite cloud. They are fluffy heaps sometimes with a greyish base. Typically cauliflower-shaped but your imagination is the only limit. The height is low and the form is cumuliform.
Cb – Cumulonimbus are high towering storm clouds and are a danger to aviation. Lightening, thunderstorms and hail are usually near these clouds. The height of the base of the cloud is low but the tower may extend high and the form is cumuliform.
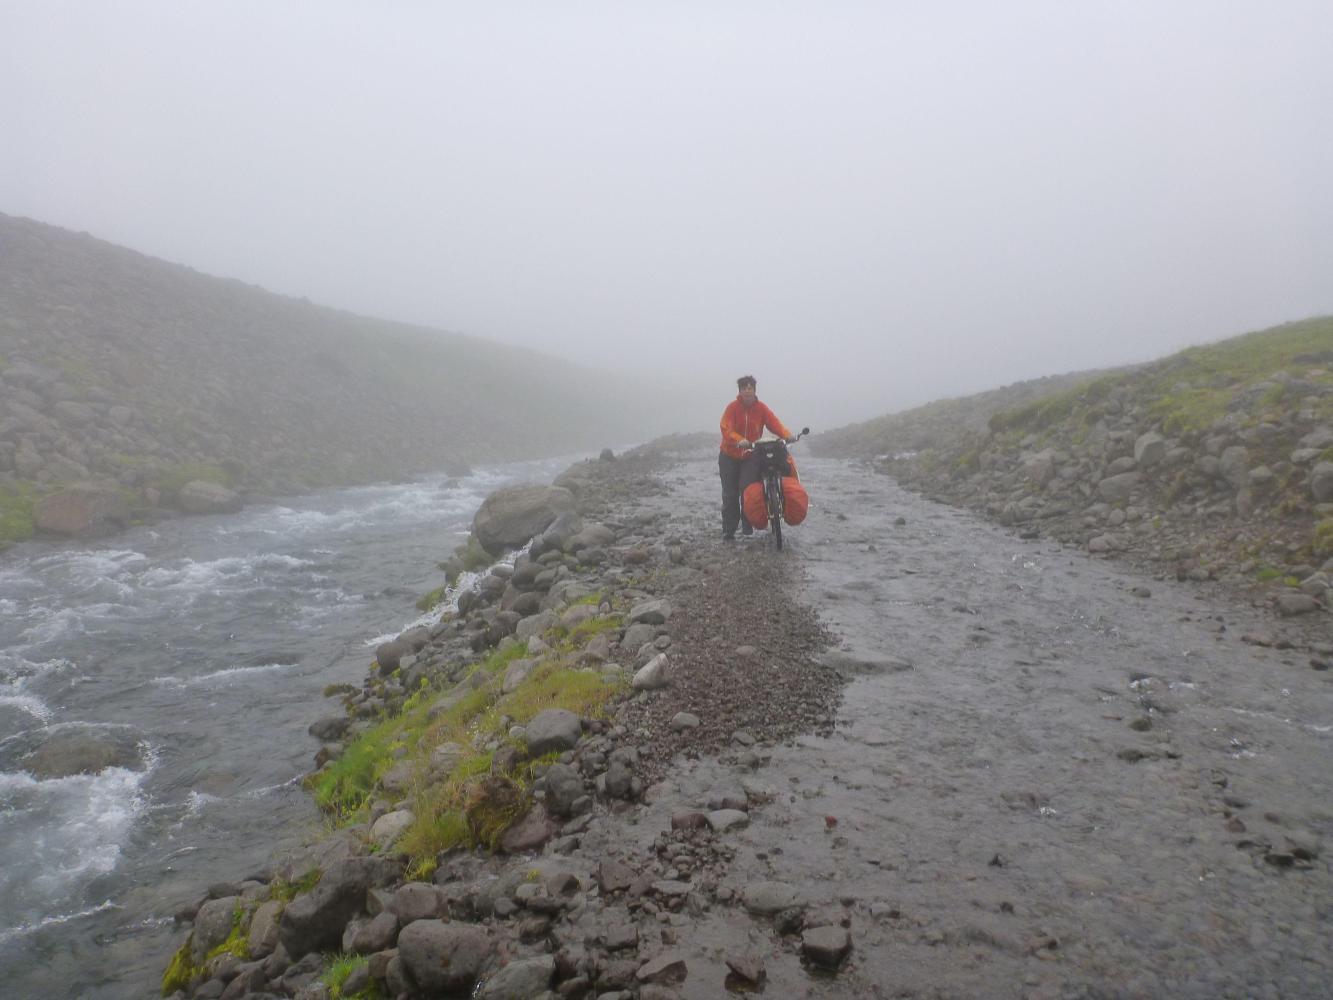
Lenticular clouds also need to be mentioned. Lenticular Ac – Lenticular Altocumulus are smooth, individual, almond-shaped clouds that form over mountains. We saw lots of these as we cycled along the Andes in Argentina and know that the are associated with very strong winds.
The cloud example images above are mostly from the Met Office training website so can’t be argued with. Below are some of my own photos that I have tried to classify, so please do to disagree if you think I have classified any of these wrongly.
NS Nimbostratus in IcelandSc Stratocumulus ? at Wicken FenCi Cirrus ? Central Iceland again.More Ci Cirrus in IcelandSt Stratus ? In PatagoniaCB Cumulonimbus ? In Bolivia
September has been a rather extravagant month long pre-deployment shopping spree. This week I have been looking for a watch and this got me thinking about time zones and how many I may need to keep track of.
Most of the communications will be scheduled and conducted on UTC. Rothera station local time is UTC-3 and there is no daylight savings changes. Punta Arenas will be on Chile Standard Time CLT (UTC-4) during winter and change to Chile Summer Time CLST ( UTC-3) for the summer. Faulkland Islands time is as clear as mud. And the local time zones will be many and varies for the field parties and other Antarctic stations that I will talk to on the HF and satellite links.
As the diameter of the earth decreases towards the poles, local time-zones boundaries become increasingly compressed and meaningless. Field parties will report their local time using the military names based on the phonetic alphabet Alpha to Zulu. Every letter of the alphabet is used except Juliet(poor Juliet), so this conveniently makes 24 time zone names. Zulu is UTC/GMT, Alpha is UTC+1, Bravo is UTC+2 ….and so on except Juliet is skipped so Kilo is UTC+10, November is UTC-1 , Oscar is UTC-2, Yankee is UTC-12.
Rothera station local time is Papa time (UTC-3). Halley station local time is Zulu time (GMT). All flying operations will operate on Zulu time (UTC). The UK of course will be Zulu time in winter and Alpha time in summer.
The field parties kit will include a printed schedule of SW broadcast radio stations to listen to news and music. Because of the mulitplicity of time zones in Antarctica the schedule lists the broadcast times Zulu (UTC) times. Usefully their are a number of Time Signal Station that broadcast the current UTC time and helpful information about atmospheric and propagation conditions to help find available broadcast frequencies. These time signal broadcast are made on 2500, 5000, 10000, 15000 & 20000kHz so they are easy to remember.
So my impossible requirements list for a watch are:
– Ideally will be orange in colour and not too macho or big and bulky
– It should be waterproof, reliable and have a long battery life
– It should show UTC in a large digital display in a 24h format
– It should also show the local Papa time ideally on a traditional 2-hand 12h format
– I like to wear a clip-on Suunto compass on my watch band so I would like this to fit on the band
– Some kind of bevel swivel ring to translate from military time zone names to UTC would be a nice to have.
I am looking for recommendations, so please do let me know if you have a watch that you are happy with that does these sorts of things .
The first aid course follows directly on from the general pre-deployment training and is also held at Girton College as a residential course.
Plymouth Hospitals NHS Trust are contracted to provide the British Antarctic Survey with a medical unit (BASMU) to provide medical advice, support and training More than 20 doctors, nurses and paramedics from BASMU came to Girton to help facilitate this amazing hands-on course for the 80 or so students.
Everyone going to Antarctica attends the first aid training at least every six years. The course started at the unlikely time of 4.00pm on Wednesday afternoon . After a few talks on basic physiology and an introduction to the ABCDE assessment process we divided up into 16 small groups for the practical work.
In our first small group session on Wednesday evening we learnt how to assess vital signs, pulse, temperature, respiratory rate and blood pressure.
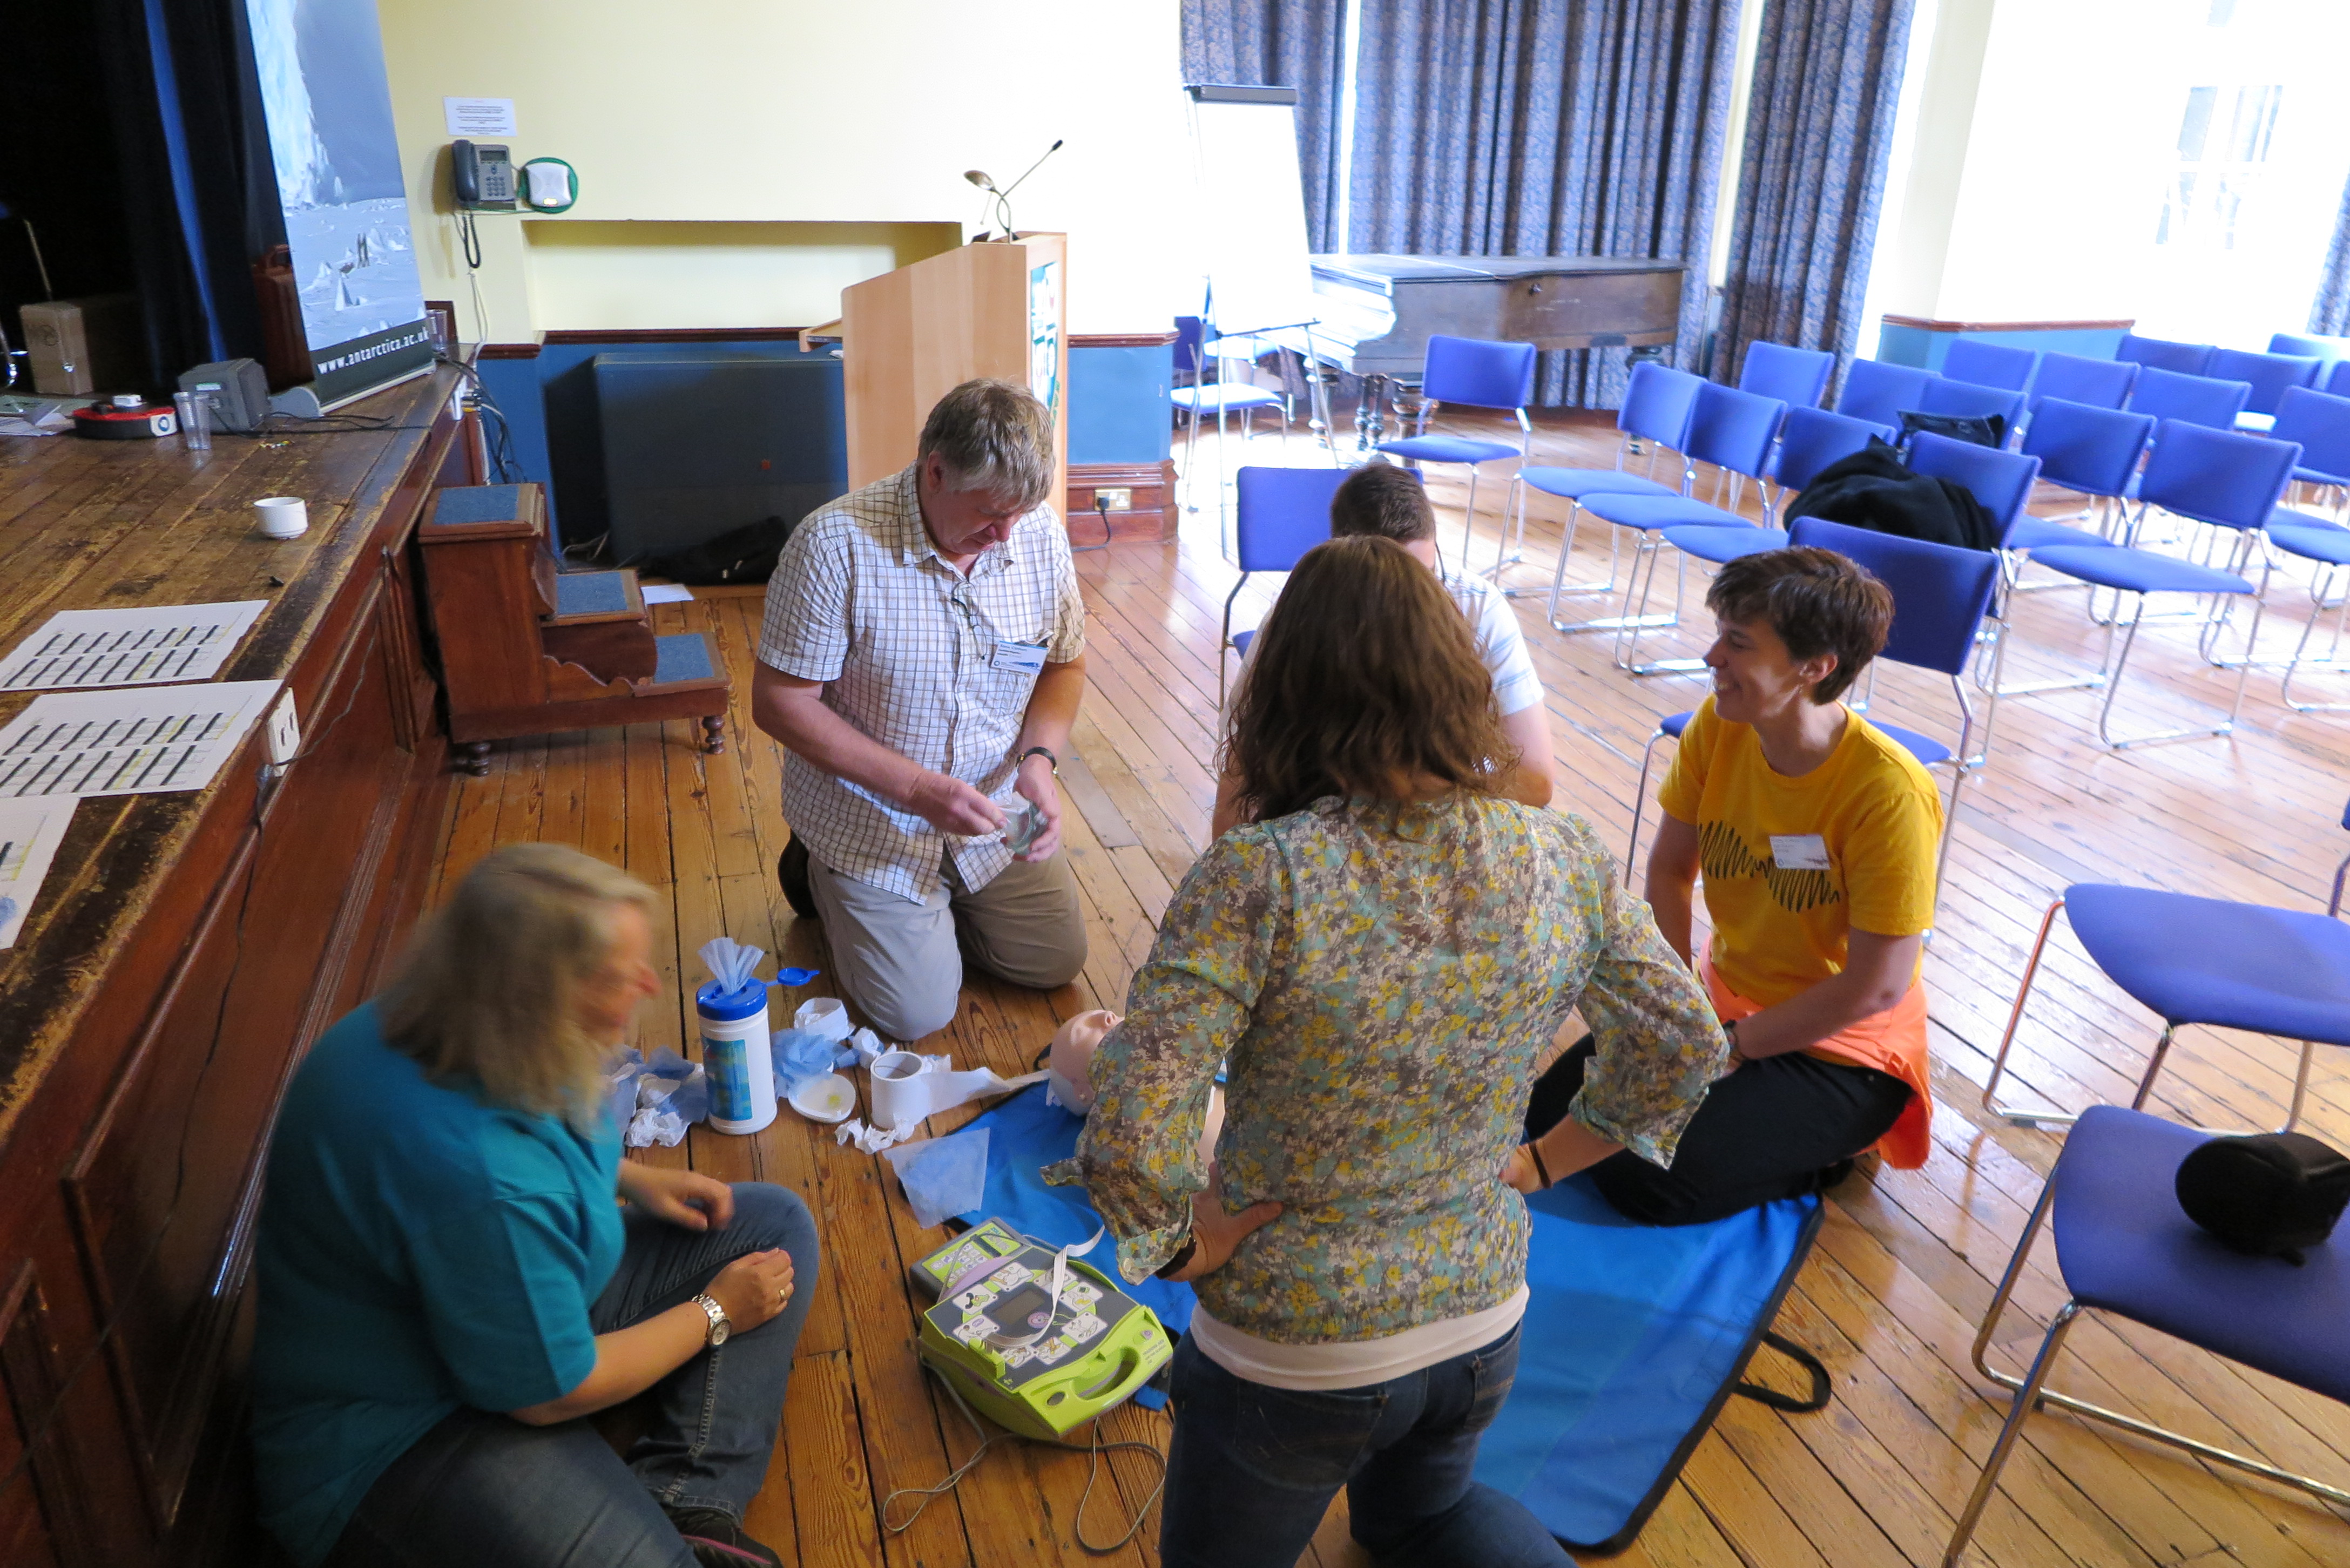
30 chest compressions then 2 breaths
Basic Life Support was the first session on Thursday morning. This session worked through a scenario of a patient in full cardiac arrest. The main focus was on quickly starting and continuing chest compressions to a depth of 5-6cm in the centre of the chest at a rate of 100-120 compressions per minute. If possible with two breaths also be added to the airways after each 30 compressions.
.
‘
This session also covered use of the defibrillator and team organisation in a CPR situation.
And if I do say so I think Team 3 worked very well together.
.
Sizing up an oropharyngeal
The next session was on airway management. The A in our ABCDE model and is the very first issue to be assessed in a first aid situation. We had learned in our life support session that it’s surprisingly exhausting tilting the head of an unconscious patient to keep their airway unobstructed by their tongue. In this session we learned about inserting nasal and oral inserts to keep the airway clear. We also got to try a variety of face masks and pumps to assist the patient breath.
Entonox mouth piece
Pain relief was the next session. We learned about the various types of pain relief available on station.
Entonox is a gas and is administer with a mouth piece that must be held by the patient. Setting up the bottle was very similar to setting up a scruba diving bottle
.
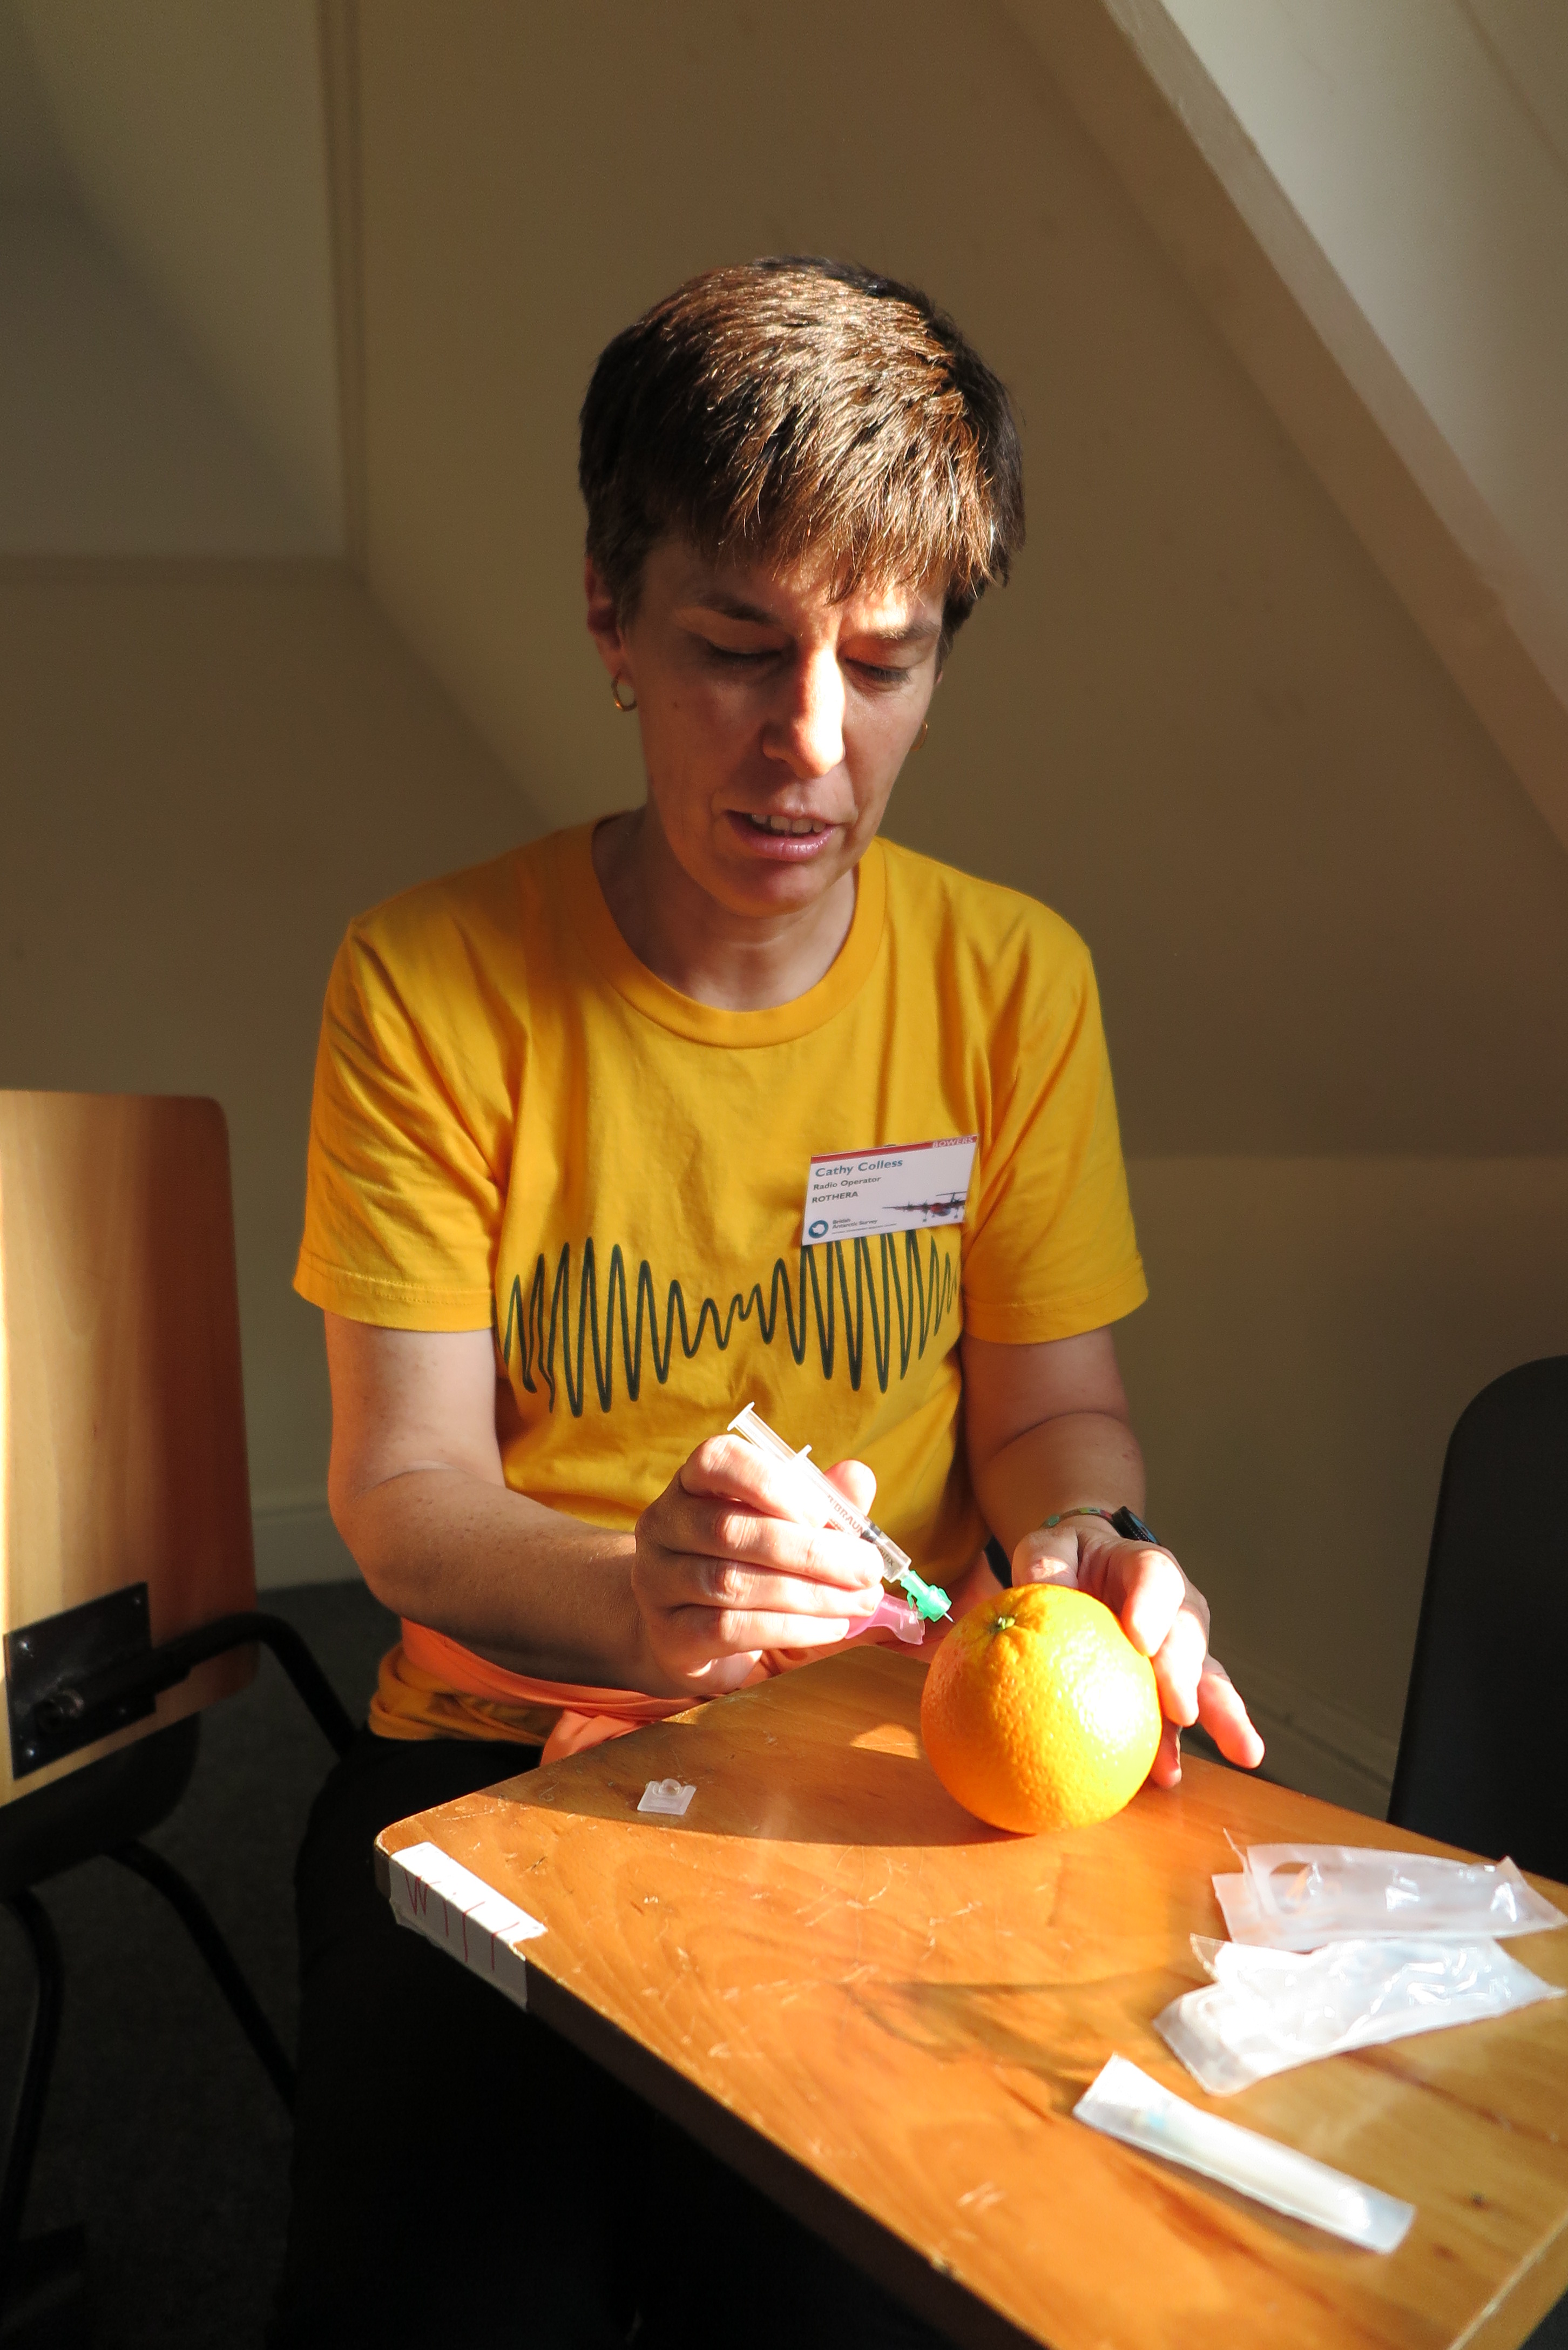
Intramuscular Injection
Next session was giving intramuscular injections. We learned to use the needles, check for allergies, buddy check process for read backs of medication type and dosage.
We also discussed site selection. For the novice the buttock is probably the best site and the upper outer quadrant of the hot-cross bun is the right location. Fortunately we used oranges for our attempts.
Safe disposal of the sharps was also covered.
.
Spinal Board
We then all gathered back in the hall as a full group for lectures on limb and spinal injuries before lunch.
We learned about splints and head stabilisation in cases where a spinal injury is suspected.
In the afternoon we were back in our groups for more hands-on for C-spinal. This one involved working as a team to log-roll a patient with a suspected spine injury onto a spinal board.
Friday morning was a series of practical assessments in surprisingly realistic scenarios. The part of the patients in these assessment activities were play by actors from the Casualties Union. The actors wear very realistic make up and are trained to accurately and convincingly present the symptoms and signs of the conditions in the scenarios.
The course concluded with some final talks on physiotherapy and dental care. And we were awarded certificates at the end.
Girton College Pre-Deployment Conference has a freshers-week atmosphere.
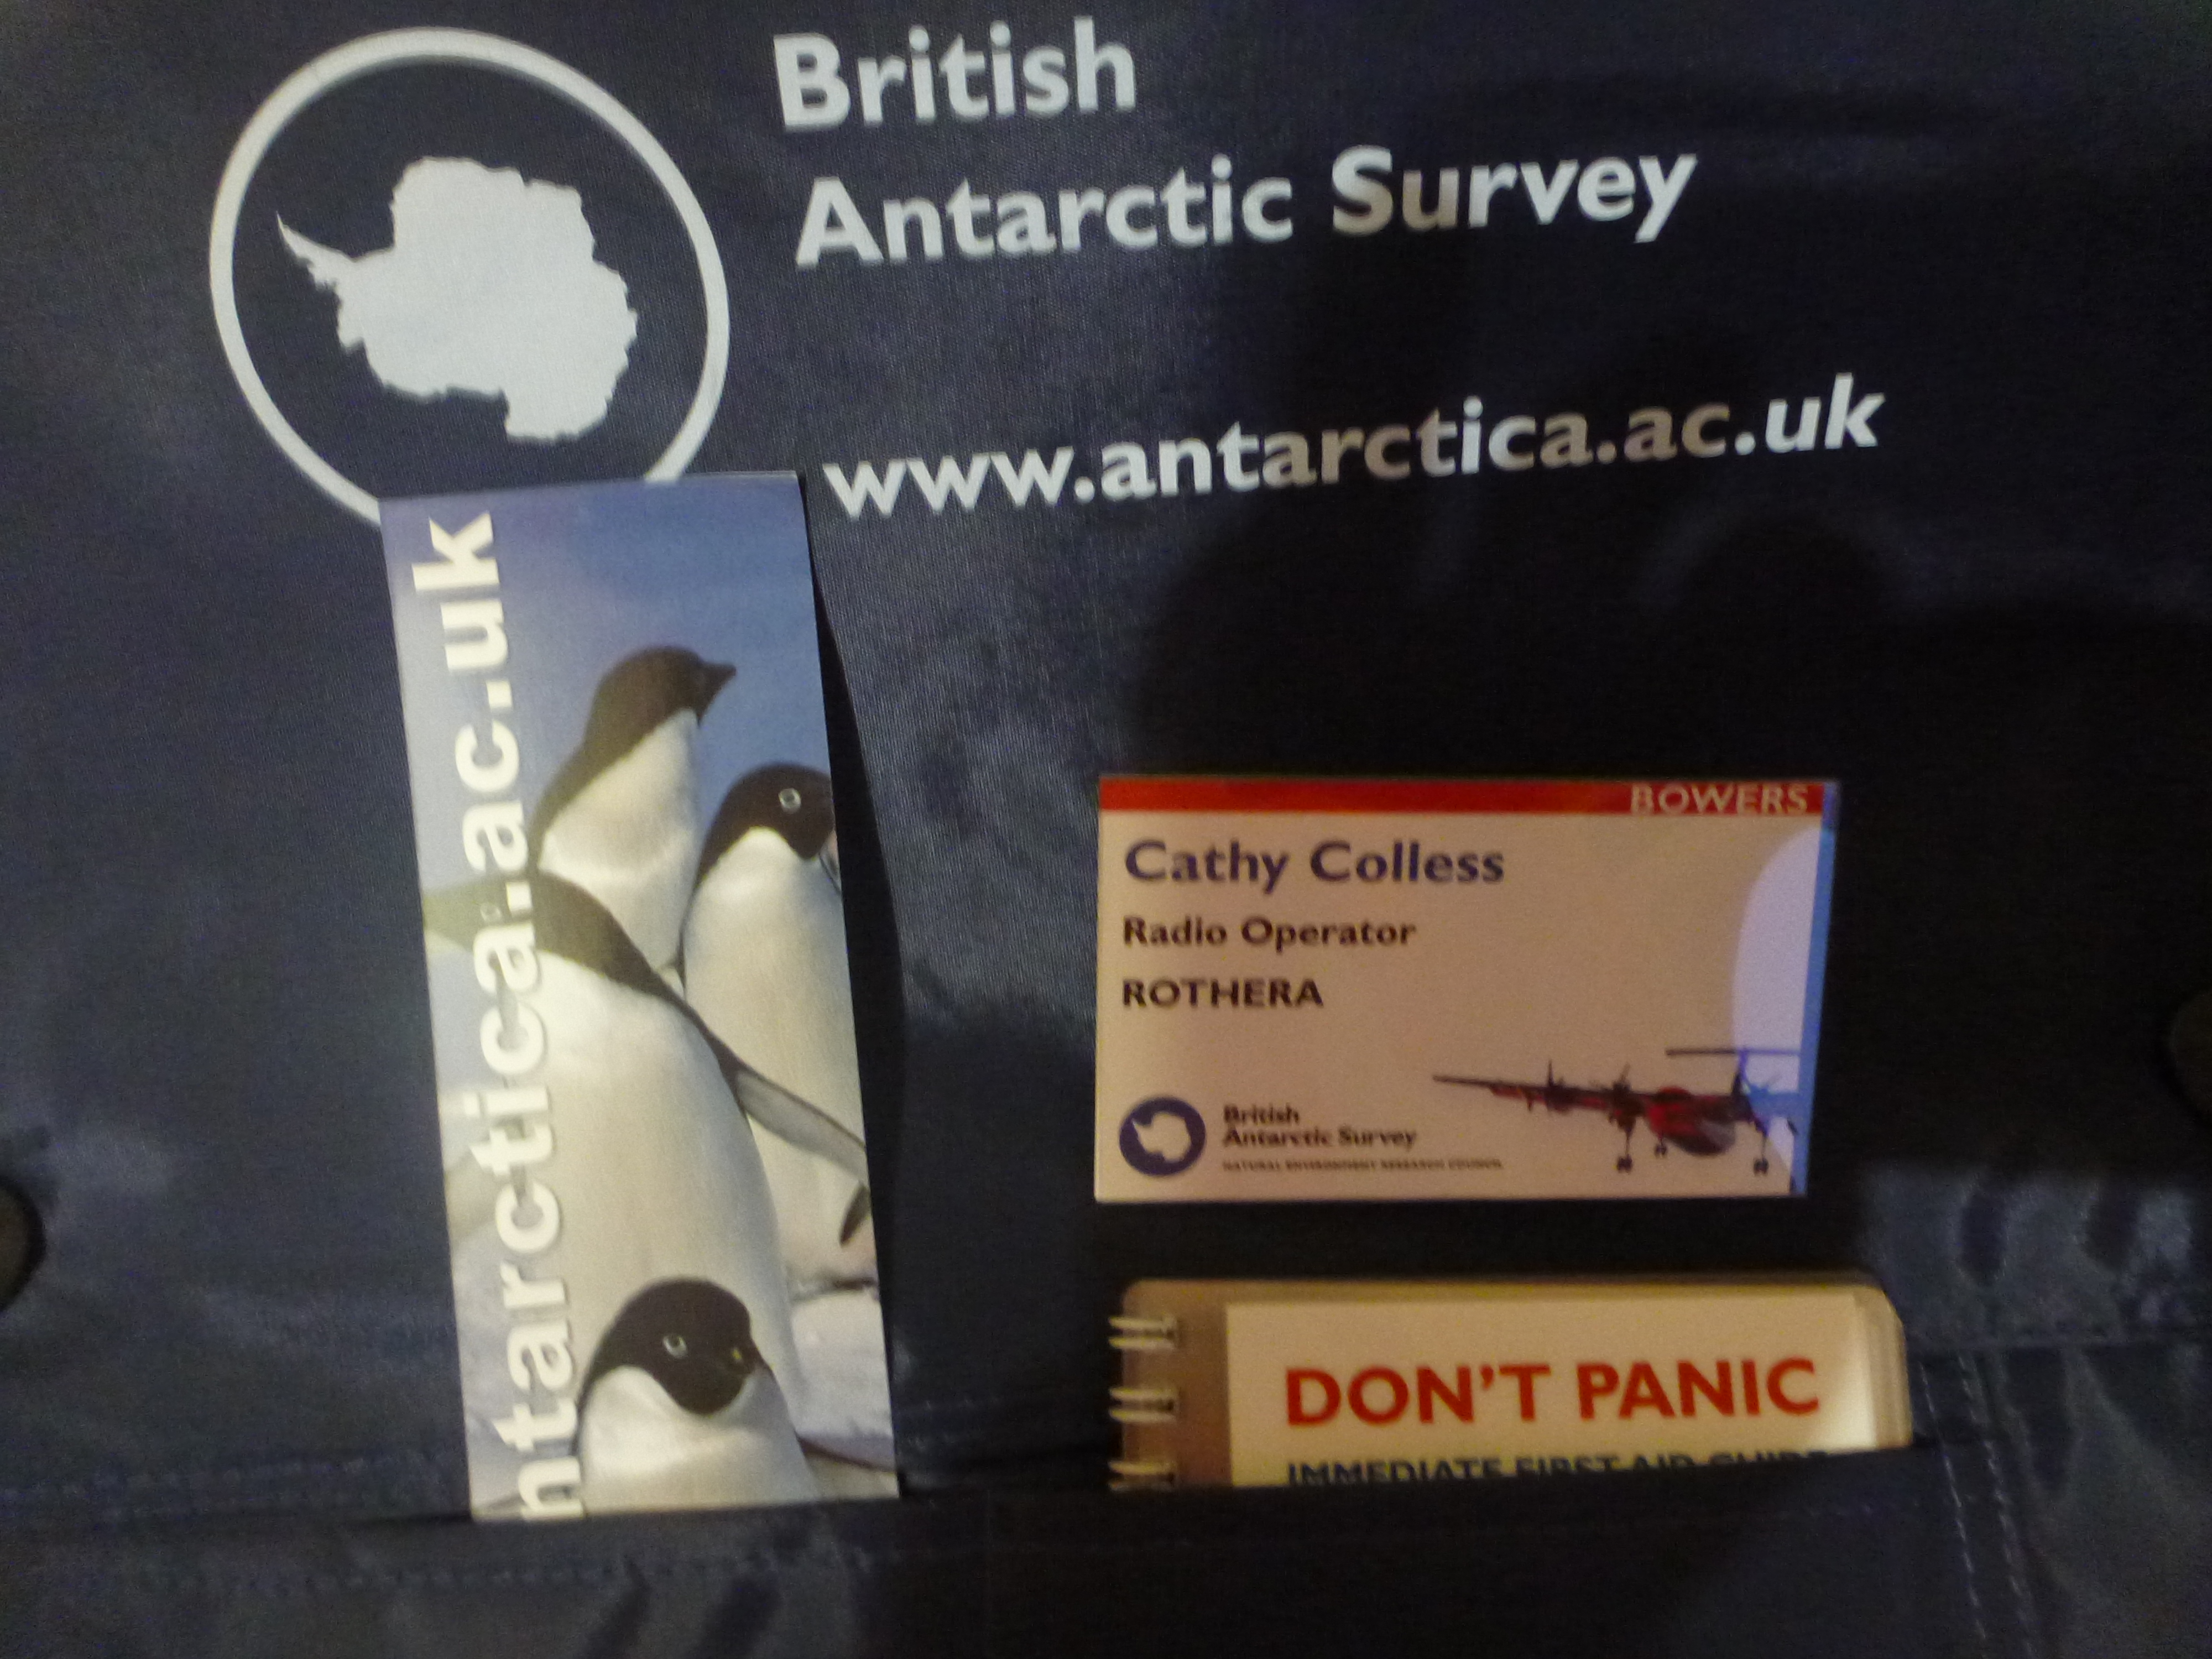
A lot of work and organisation has clearly gone into organising this complex event. I was warmly greeted on arrival then directed first to the college porter who gave me a key to my single bedroom, then towards the registration desk where I picked up my information packed conference badge, bag and wifi password. My tensions eased when I opened the conference bag to see in big red letters the words “Don’t Panic”. Then a quick ID photograph before moving to the coffee/tea room. Because I am only going for the summer I was excused from the blood type testing.
The evening kicked off with a welcome from Jane Francis the Director of BAS followed by a breakout into Base specific groups. Each of us had to introduce ourselves and explain what we were off to do. Then it was dinner at the Girton College banqueting tables.
Conference bag and badge
Monday started with a session on the logistics of travelling to Antarctic. The 3 gateway ports are Capetown, Punta Arenas and the Faulkland Islands. And from these gateways the final hope will be either a ship or a Dash 7 flight. My travel will be on the 5 hour long flight from Punta Arenas on 21 October.
The Antarctic clothing and working session was next up. Lots of sensible advise about layering clothes aiming for a sustainable day-in-day-out system. The recommendation for sunglasses is for category 4.
The HR session was next and was very nicely facilitated. We broke into small groups and discussed some case studies around issues such as bullying, responsible use of alcohol and dignity in the workplace.
After a quick coffee break we were into the aircraft session which explained the types of aircraft and work that the air unit undertake. The Twin Otters always fly with an assistant (co-pilot) and the Field Operations Manager runs a roster of base staff assignments for this duty. Predictably all the questions focused on who and how to bribe people to get co-piloting opportunities.
The Science sessions were exceptional, my chest grew 2 inches with pride just knowing I was going to play a small part in the delivery of these inspiring science projects.
The Science Stations briefings were exceptional this one had 800,000 year old ice cores and tropical plant fossils.
Over lunch we had the opportunity to visit a range of information/poster booths setup by the Polar Data Centre, HR, MAGIC GIS and Information Services.
Who is that guy on the Polar Data Centre Poster ?
Twin Otter body section. Surprisingly thin and flexi.
Safety and personal responsibility were a constant theme across all of the sessions. Two of the first days sessions focused on the procedures and expectations regarding safety.
The hour before dinner was spent in our “base groups”. For me this meant I was with by far the largest group, for Rothera. This was the point in the conference I really started to appreciate what an adventure this summer will be. There are so many incredible field expeditions leaving from Rothera this summer and I will be the friendly voice at the end of the radio for these field parties. Each day I will spend 15 minutes speaking to each party. Initially I will give and take meteorology reports, ask if they have an requests and log these into the field request system, ask whether they need anything notified through to Base Commander, Doctor or FOM and check the status of their CO2 detectors. Then free-chat, where I will relay any news or points of interest, or just make them listen to me waffle.
After dinner I joined the Field Party job specific group meeting. This session talked through the operation and systems for supporting field work. We also got a walkthrough of the new Operations GIS system being developed by the MAGIC GIS team at BAS.
And bed !
Tuesday breakfast at 7.00am then back to the sessions.
Henry Burgess from the Foreign Office was the first person I had seen wearing a tie at the conference. Henry kicked off Tuesdays schedule of sessions, reminding us that we are a presence as well as a scientific base. And that at all times our behaviour needs to be professional and respectful of the environment.
Rachel Clarke took us through our important environmental responsibilities while living and working in Antarctica. Rothera is covered by the Antarctic Treaty so strict rules, fines and reputational damage could result from any breaches. Plants and animals cannot be disturbed without a scientific study permit. Strict procedures needed to be followed to prevent the introduction of non-native species. We were advised to thoroughly clean all our footwear and outerwear before leaving. We will need to keep a 5-10m distance from and not feed any wildlife. We can remove pretty much nothing from Antarctica, no plants, eggs, rocks, fossils or meteorites . Moss grows so slowly that footprints could last for decades, so walking on moss is a very strict non-no. All waste except treated sewerage and food waste must be removed from Antarctica.
And importantly this session explained poo-bins, solid human waste cannot be left in the field. This means that we will need to carry and use little plastic poo-bins. Fuel spills are a significant issue so the other point that was emphasised was never-ever to leave re-fuelling of aircraft or vehicles unattended. We must stay and watch any refuelling process from start to end un-distracted.
A particularly useful session was the one run by Pete Bucktrout the BAS photographer. Condensation is the killer of cameras in Antarctica. Bringing a cold camera directly from a cold environment into a warm most tent or building will kill it with moisture from condensation. He suggested that after using a camera in the cold we should remove any frost from the camera with a soft shaving brush then seal the cold camera in plastic bag before bringing the camera into a warm environment, leave the camera in the plastic bag until it reaches inside temperature. Also worth noting that Pete recommended using UV lens covers and said it is worthwhile considering bringing a go-pro video camera. He also noted that a manual view-finder is useful as LCD screens don’t work below -20 and manual contrast control is useful. Craking good session !
The final practical session was about the two BAS ships the Ernest Shackleton and the James Clark Ross. Many of the conference delegates (not me) will travel to the conference on a ship and this session explained what to expect onboard.
At lunch we lined up in the courtyard for the traditional group photograph.
Girton 2014
The afternoons sessions were about team work and motivation. The activities involved a stick lifting exercise, an auction of team attributes and some fun sessions on managing conflict. This was followed by a more sombre presentation on HR requirements. Adam Bradley then gave an amazing presentation about his trips to Antarctica followed by some jaw dropping footage from Pete Bucktrot’s work.
Jane Francis the Director of BAS closed the conference by asking us all to take away three key messages from the conference:
When pilots use an airfield they follow published airfield procedures . I have been learning how Rothera airfield is used and what procedures arriving and departing aircraft need to follow.
The most basic piece of information a pilot needs about an airfield they intend to use is the magnetic heading of the runway. They can’t land sideways onto a runway so obviously they need to know what their compass needs to be pointing as they approach the runway. Because this information is so fundamental it is actually encoded into the number assigned to the runway.
Runway 23-05 Sign @ Cambridge Airport
For example Cambridge airport runs kinda east-west. Approaching Cambridge Airport from the east you need to be heading 230 degrees on your compass to hit the runway directly and approaching from the west you would need to head 050 degrees (180 degrees from 230). Cambridge runway has therefore been assigned runway numbers 05 and 23. The runway number tells the pilot the heading to approach the runway with.
Rothera runway numbers are very easy to remember as the magnetic heading of the runway is straight north-south. The runway numbers assigned are therefore 36 (from the south) and 18 (from the north). The number 36 would be painted in big white numerals at the southern threshold of the runway and 18 at the northern end of the runway.
The Co-ordinates for the thresholds of the two runways are:
Runway 18 67 33.83 South 068 07.40 West
Runway 36 67 34.27 South 068 07.85 West
Clever-pants readers might be wondering why the westerly co-ordinate differs for the two thresholds if the runway runs directly on a north south magnetic heading. The reason is
Rothera Variation 21 degrees East
that the co-ordinates are given in True while the runway is given as a Magnetic bearing. Because of the vicinity to the South Pole there is a significant difference between true and magnetic headings at this latitude. The variation is 21 degrees east. Maps of Rothera runway will show it pointing at one o’clock. But if you stood on the southern end of the runway a compass would point at twelve o’clock.
Runway 18 Lefthand
The circuit direction is also important airfield information . The circuit direction is described as either left-hand or right-hand, according to which way the pilot turns in the circuit. At Rothera there is a large mountain to the west of the runway so the circuit is always to the east of of the runway. This means that Runway 36 has a right-hand circuit and Runway 18 has left hand circuit.
There is unlikely to be a lot of circuit traffic at Rothera. But the circuit direction and circuiting procedure will still be important to pilots because they may choose to do a go-around then come back around circuit or have a problem such as a bird strike during a take-off and want to come around the circuit and land.
Looking West. Circuit is on the east to avoid those mountains.
The circuit height is 1,200 feet. The elevation of the airfield is a tiny 13 feet.
The missed approach point (MAPt) is the point at which a pilot will decided whether they are going to continue into land or execute the missed approach procedure. The Rothera missed approach point RMAPt is 1.5 nm from the runway. The minimum descent altitude(MDA) at the RMAPt is 700 feet.
The local barometric pressure is an important piece of airfield information. Pilots use this information to calibrate their altimeters . Without an accurate pressure a pilot won’t accurately know their altitude(bad). Pressure is typically provided to pilot as hector-pascals for a QNH (pressure msl) or a QFE(pressure at the runway threshold). Because the runway at Rothera is only 13 feet above msl there is very little difference between the QFE pressure and the QNH pressure. The QFE is one hector-pascal lower than the QNH. So I just looked at the current pressure measurement for Rothera and I can see that it is reading 979 hPa. From this I know that the QFE is 979 and the QNH is 980.
Pressure = 979 hPa therefore QFE= 979hPa and QNH =980hPa
The VHF frequency 129.7 MHz is for Traffic Information Broadcast by Aircraft (TIBA) in the region. Pilots will listen to the is frequency and broadcast any pertinent information for other aircraft in the vicinity.
There are various ways aircraft can contact Rothera tower. Rothera is a prior arrangement only airfield so any visiting aircraft will have phoned to make arrangements prior to departing. For long distance contact with Rothera tower from the air pilots have three HF channels 9106.0 kHz, 7775.0kHz and 5080.0kHz. Alternatively the aircraft have Iridium satellite phones and could call the tower on 881 631 831 227. Once closer to the station probably less than 50 miles they should be able to make VHF radio contact on 118.1 MHz from which we would expect a clearer and more reliable connection. We will be listening on all of those communication links in the tower, so I hope that don’t all go active simultaneously.
The official hours of operation of the airfield are 1100 to 0000 Zulu time, Monday to Saturday, October to February. Zulu time is UTC and the time offset at Rothera is UTC-3 (P – Papa time). Converted to local time the operation hours will be 0800 to 2100 local time. But in reality we will work much longer hours than this in the summer if the weather is favourable for flying.
It has been mentioned in my training that local Rothera base operations use hand-held marine radios on Channel 1. And Channel 18 is used as a secondary operational channel for coordinating cargo work and fuelling operations. Sounds simple I thought.
Until it was further explained that there is a VHF Channel 1 repeater on the ridge above the base and a Channel 18 repeater mounted on the tower. Perhaps I shouldn’t admit my ignorance here in public, but initially I was puzzled as to which frequencies the repeater would be listening for and transmitting on to repeat a these marine VHF channels.
I found the answer by learning more about the difference between simplex and duplex VHF marine channels.
The VHF frequencies between 156.0 and 162.025 MHz have been assigned to marine radio communications. But you rarely hear anyone refer to specific frequencies it is always described in terms of channels. For example 156.8 MHz is the international calling and distress channel but it is always referred to as Channel 16.
Simplex channel
Now say myself and a friend are dropped at a very remote field camp and we both have marine handheld radios with us. Now I (wrongly) assumed that we could use these walkie-talkie style for line-of-sight communications around the camp area on a channel of our choosing. But what puzzled me is how a repeater could possibly be fitted into this scenario. If the VHF radios are talking directly to each other you wouldn’t also want a repeater duplicating the message on the same frequency. That would be mayhem.
In fact direct walkie-talkie style communications only works on marine radios for simplex channels (eg 6,8,9,10,11,12,13,14,15,16, 17…).
Channel 01 only listens to repeaters.
Duplex channels were designed to solve the repeater problem. The VHF duplex channels (eg 1,2,3,4,5,7,18,19,20…) only work when a shore based repeater is in range. You cannot talk directly station to station on a duplex VHF channel.
If someone is standing right next to you and you transmit a message on channel 1 the person next to you will not receive the message because channel 1 is a duplex channel. This means that channel 1 on their radio is not listening to the same frequency that channel 1 on your radio transmitted on. However if you both change to channel 6 which is a simplex channel your radios will indeed now happily talk directly to each other on 156.3 MHz.
So what’s the difference between simplex and duplex ? Simplex is simple there is only one frequency assigned to the channel and marine radios transmit and receive on that frequency. For a duplex channel two frequencies have been assigned to the channel and marine radios have been built to receive on a different frequency to the transmission frequency.
On channel 1 marine radios will be listening (RX) on 160.65 MHz but sending(TX) on 156.05 MHz. This means that two radios both tuned to channel 1 cannot listen directly to each others transmission. On channel 1 the radio is only listening for messages from the repeater. A channel 1 repeater like the one on the ridge at Rothera listens (TX) on 156.05 MHz and re-transmit(TX) this on 160.65 MHz. The radios around the base station only listen to the transmissions from the repeaters on 160.65 and ignore all the 156.05 transmission from the handsets.
This matters for a couple of reasons. Firstly if the repeater were to fail all base communications on channel 1 would instantly stop working. Folk around the base couldn’t talk directly to each other. But they could simply change to say channel 6 or 17 which are simplex channels and talk station to station. Also if a field party wanted to use marine handsets for camp communications out of range of the repeater they would need to choose a simplex channel.
In summary choose a simplex channel for direct station-to-station communications and choose a duplex channel only for station-to-repeater-to-station communications.
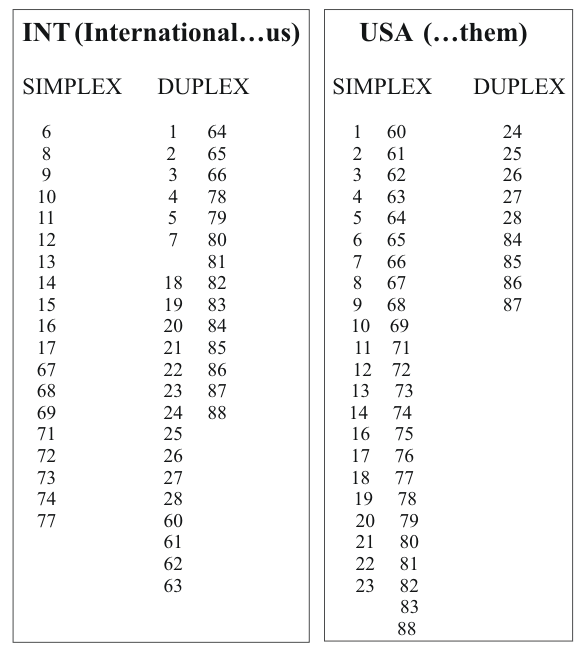
Below is a useful table from http://www.thecoastalpassage.com/vhf.html which lists the Simplex/Duplex allocation for the USA and everyone else.
Flying was a very tangible freedom. In those days, it was beauty, adventure, discovery, new worlds.
(Anne Morrow Lindbergh, 1929)
Not any more. The International Civil Aviation Organization (ICAO) was formed in 1947. And today flying is very a regulated and planned activity. Pilots strictly follow ICAO FPL flight plans. All Dash 7 flights in and out of Rothera require the submission of an ICAO FPL flight plan to the global Aeronautical Fixed Telecommunications Network (AFTN) cloud.
One of the computers in the tower at Rothera has been connected to the UK AFTN Parent node located at the CAA London Control Centre in Swanwick . This computer is running an AFTN Terminal Application that can send and receive flight planning and meteorology messages to the AFTN cloud(via Swanwick).
To prepare for a Dash 7 flight we will need to send an FPL flight planning message (based on a template) to the AFTN and record the AFTN message number onto the flight following log sheet. When the flight departs we will send a DEP message to the AFTN and record the message number on the log sheet. Once the aircraft arrives at the destination an ARR message will be sent and logged. We will also be able to use the AFTN terminal to report delays (DLA), send progress report messages, request METAR meteorology reports or if necessary cancel (CNL) a flight plan. If the AFTN terminal fails the backup procedure is to print the FPL form (CA48) and fax the form to Swanwick. We will also receive AFTN messages such as METARs and flight plans and progress updates sent by other stations regarding aircraft in the vicinity.
I will be trained in the specific processes for managing the Dash 7 plans when I arrive on the base, however this week I have been learning generally about UK Flight Planning procedures. Yesterday we visited the operations tower at Duxford Airport and learned about the systems and procedures to submit, activate and progress FPL flight plans via an AFTN terminal. Colin also usefully suggested that I read the CAA UK Flight Planning Guide CAA CAP694.
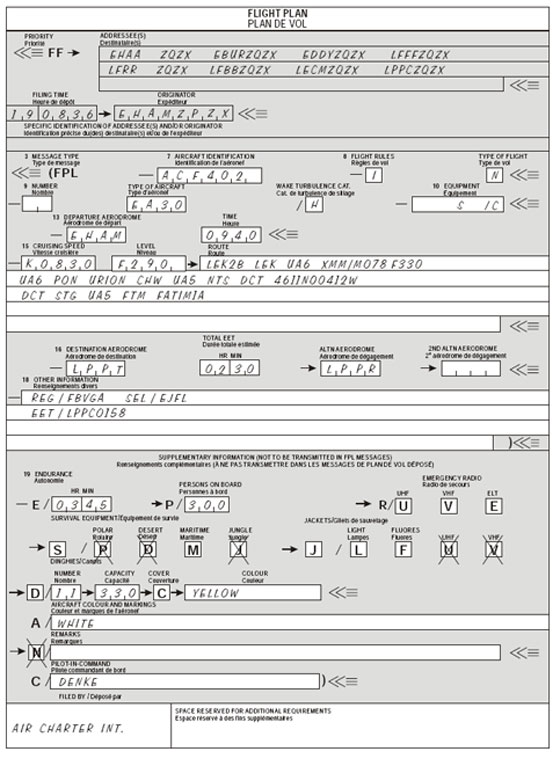
Nowadays flight plans will almost always be submitted electronically either via an AFTN terminal like they do at Rothera or online via the flight planning webpage . But I found that initially attempting to understand how to complete the paper form and read the raw text FPL messages was a good way to start gaining an understanding of the layout and coding requirements of flight planning AFTN messages.
At first sight the form and message seems quite impenetrable. But of course once you learn the message format and all the codes by heart the form magically transforms from a wad of meaningless gobbledygook-gook into a gloriously concise and precise presentation of a large amount of information.
The remainder of this story will discuss in some detail the individual fields on an FPL message, if that’s not of interest to you then you might want to leave it here. Otherwise, grab a hot drink (you will need it) and let me talk you through the format and coding of a ICAO FPL flight plan message.
The Aircraft Identification code (Callsign) is the first question in the FPL message section of the form. I will need to have the BAS aircraft callsigns at the tip of my tongue when I am working in the tower. The bathroom wall is kindly helping me learn these.
The Flight Rules codes are relatively simple:
I = Exclusively IFR (Instrument)
V= Exclusively VFR (Visual)
Y= Initially IFR but will change to visual during the flight
Z= Initially VFR but will change to instruments during the flight
The Type of Flight codes are straight forward and almost guessable:
S = Scheduled Service
N = Non-scheduled Operation
G = General Aviation.
M = Military
X = Other than any of the defined categories above.
The Number of Aircraft field is left blank unless it is more than one. No codes to learn.
The Type of Aircraft code is the ICAO Aircraft Type Designator which can be looked up in the ICAO DOC 8643. I will need to know the BAS aircraft designator codes without needing to look them up and hence am learning these with the help of the fridge.
ICAO Aircraft Type Designator Codes
The Wake Turbulence Category codes are relatively simple:
H = Heavy > 136,000 kg
M = Medium > 7,000 kg (eg Dash 7)
L = Light < 7,000 kg (eg Twin Otter)
The Equipment field has two parts with a / used as a field separator. On the left side of the / the Radio, Navigation AND Approach Instruments are coded. The letter S can be used to note that the standard equipment including VHF RTF, VOR and ILS is fitted. On the right side of the / SSR transpoder and other surveillance capabilities are noted.
So for example -S/C indicates standard equipment and a mode Charlie transponder.
The Departure Aerodrome code is entered as an ICAO airport code. I unquestionably need to learn these by heart for the airports in the vicinity of Rothera so they get prized position at the kitchen sink.
ICAO airport codes on the wall behind the kitchen sink
If the airfield hasn’t been assigned an ICAO code then ZZZZ can be entered and the name entered manually in the Other Information field preceded by DEP/
And if the aircraft is already in flight then AFIL can be entered.
The Time of Departure is always entered as Z-Zulu time which is UTC.
This time is referred to as the estimated off-block time (EOBT)
The Cruising Speed entered is the cruising True Air Speed and can be entered as :
Knots (e.g. N0215)
or Kilometres (e.g. K0400)
or Mach number, to the nearest hundredth of a mach (e.g. M033)
The Crusing Level can be entered in one of the following formats:
Flight Level(e.g. F230 for Flight Level 230)
Altitude in hundreds of feet (e.g. A230 for 23,000 ft)
Tens of metres on standard atmosphere (e.g. S0700 7000m on 1013)
Altitude in tens of metres, (e.g. M0700 7000m above msl)
or the letters VFR if a cruising level is not planned for the flight
The planned Route section of the form is where the details of planned changes to speed, levels and flight rules will be entered. For us this information will be provided by the Flight Operations Manager and we will enter the details into this section. I might write another post about the format of these plans. It is too much to go into here.
The Destination Aerodrome is entered as an ICAO airport code. I have already discussed ICAO airport codes in the departure aerodrome section so I won’t repeat it.
The Total EET Time is the total estimated elapsed time. It is worth emphasising that this is NOT the estimated time of arrival. This is the total estimated time required between take-off and arriving over the destination aerodrome. The EET is expressed in hours and minute as a 4 digit number. For example a flight with and EOBT of 0900 and an EET of 0130 would have an ETA of 1030 and only the 0900 and 0130 values are included on the form.
The Alternate Aerodrome is entered as the ICAO airport code for the airfield where the pilot will take the aircraft if the destination airfield cannot be reached. For example SCRM (Marsh Airport on King George Island) might be an alternative airfield for a flight to SCCI (Punta Arenas). The FPL plan will appear in the AFTN terminal of the Alternate AIrfield so that they are aware of the information within the plan and can monitor the flight progress updates. Again use ZZZZ and manually enter the name preceded by ALTN/ in the other information field if the alternate airfield has not been assigned a ICAO airport code.
In the Other Information field you can enter a 0 (Zero) if there is no other information. But that will not be the case as a minimum the date of the flight (DOF/) in YYMMDD format will be entered into this section.
It’s also very likely that some information about the IFR instruments and capabilities of the aircraft(PBN/ and NAV/) will be included. These information included in this section will be very specific to the aircraft equipment and routes. I will learn more about what information is included in this section . When I arrive in Rothera. It is perhaps worth mentioning that the coding of this information changed in 2012.
The Supplemental Information is not included in the main FPL message, it is kept at the location where the FPL is filed.
In the Endurance (E/) field enter the fuel endurance in hours and minutes format.
In the Persons On Board ( P/) field enter the total number of passengers and crew if this is not known at the time the plan is submitted you can enter TBN.
The three Emergency Radio (R/) check-boxes should be reviewed and crossed out with a large X if the aircraft is not equipped with the relevant radio. If the aircraft does not have UHF on frequency 243.00 MHz then put a cross through the U box. If the aircraft does not have VHF on frequency 121.500 MHz then put a cross through V box (but this is very unlikely). If the aircraft does not have an emergency location transmitter (ELT) then put a cross through the E box.
The four Survival Equipment (S/) checkboxes should also be reviewed. Put an X through the P if polar survival equipment is not carried. Put an X through D if desert survival equipment is not carried. Put an X through M if maritime survival equipment is not carried.
And put an X through J if jungle survival equipment is not carried.
The three Jackets (J/ ) checkboxes should be reviewed.
Put an X through L if life jackets are not equipped with lights.
Put an X through F if life jackets are not equipped with fluorescein.
Put an X through U and/or V; as in R/ (above) to indicate radio capability of
jackets, if any.
In the Dinghies (D/) section put an X through both D and C if no dinghies are carried. If Dinghies are carried enter the number of dinghies carried and total capacity, in persons, of all dinghies together. Put an X through the C if the dinghies are not covered and enter the colour of the dinghies.
In the Aircraft Colour and Markings (A/) enter the colour of aircraft and any significant markings.
If you don’t need to enter any special Remarks (N/ ) Simply put a X through the N . You may however use this field to make remarks regarding survival equipment on the aircraft.
In the Pilot field (C/) enter the name of the pilot-in-command.
The Message Header
The FF header section at the top of the paper form isn’t strictly a part of the FPL message. A header would be needed for any message (eg ARR DEP). This informs the routing of the message that follows, much like the header in an email.
In the header you need to specify the message recipients (destinations), sender (originator) and the filing time in the header section of the
The Message Header Destination Addresses are AFTN addresses. These are eight characters long made up of:
– A four-letter ICAO Location Indicator (on the kitchen sink wall)
– A three-letter-group identifying a specific service area . I have not yet found a definitive list of these code but below are the examples cited on wikipedia:
YFY = AFTN Office
ZTZ = Control Tower
ZPZ = ATS Reporting Office
ZQZ = Area Control Centre
YNY = Notam Office
YDY = Airport Manager
YZY = Met Data Bank
YMY = Local Met Office
ZRZA = Radar Approach
– The 8th character is an additional letter to identify a department or process within the service area . The letter X is used if the department is not needed.
So for example the destination address for the Tower at Mount Pleasant Airport in the Faulkland Islands might be EGYPZTZX. Another example could be SCRMZQZX for Area Control at Marsh Airport.
The Filing Time is format is DDHHMM(Zulu). So for example 190836 means that the message was filed on the 19th day of month at 08:36 UTC time.
The Originator Address will use the same format as I just talked about for the recipient but obviously this will be the address of the message sender.
To top-off our air-ground radio training we were fortunate to be invited to visit the Radio Communications tower at Duxford Airport. This was incredibly useful in terms of seeing flight planning, meteorology report passing and tower operations in action. Colin and Peter were most generous with there time and knowledge.
Colin and Pete explained the numerous systems and software they use in the Tower.
One of the scarier sounding jobs I will be doing at Rothera will be submitting formal FPL flight plans into the AFTN terminal for Dash 7 flights. I don’t really know the reason why plans are required for the Dash 7 flights but not the Twin Otter flights. It might be because the Dash weighs more than 5,700 kg, while the Twin Otters weigh less. It was great to see the AFTN software being used at Duxford. Colin gave us a very helpful and thorough walk-through of the coding, submission and updating of a flight plans via the AFTN software. The flight plans are very code heavy messages and at first sight seem quite impenetrable.
Duxford tower operations also pass a lot of meteorological reports to and from pilots. During our visit a Catalina PBY took off and departed up through the cloud ceiling. Colin collected and relayed a meteorology report from the Catalina pilot as he left the airfield.
Colin taking a met report from the Catalina PBY
Colin also took us through the process of decoding, translating and reading out meteorological reports and forecasts from the TAFs and METARs he downloads twice hourly from the Met Office Aviation Briefing Service.
As a radio operator at Rothera Station I will be doing aircraft flight-following. This means that I will be taking regular position and meteorology reports from BAS pilots and in return giving them meteorology reports and any other information they require about the airfields and areas they are flying towards.
In the UK Ofcom are the officialdom custodians of the radio frequencies. For the air band frequencies Ofcom delegate responsibility for training and licencing of operators to the Civil Aviation Authority (CAA). The CAA recognise three levels of ground to air radio service/licence. The highest level is air traffic control (ATC), then flight information service (FISO) and thirdly the much more basic air-ground radio (AGCS). Rothera base offer just the basic air-ground radio service. To operate the radio service at Rothera station it is appropriate for me to hold a CAA AGCS Radio Operators Certificate of Competence. Obtaining this licence involves passing both a written and a practical exam. The theory exam covers all of the material in CAP 452 Aeronautical Radio Station Operators Guide and the sections of CAP 413 Radiotelephony Manual relevant to the air ground radio service and take a practical exam.
BAS run a course each year to train and licence the radio operators for the upcoming season. I spent my first week working for BAS on this course. This was hands-down one of the best training course I have ever attended. Paul is a Senior Air Traffic Controller at Stansted Airport. He has been providing this training for BAS for many years and it shows. The course is very well structured and paced.
The first morning was spent summarising the theory material that ideally you will have self-studied before the course. Then we started talking on the radio.
Paul has a tidy set of kit that he uses to run the practical practice sessions. We students sit in a cubical wearing a headset, we have a PTT button to transmit and the local pressure, wind and circuit information is posted on the booth wall as it would typically be in a radio office. Paul sits outside the booth with a unit connected via a serial cable and pretends to be various aircraft.
The first practicals was a straight forward communication with a single aircraft on the apron preparing to depart. The second practical was also just an single aircraft, this time an incoming aircraft wanting to join the circuit to land.
On the second day of the training Paul started increasing the number of aircraft involved and the types of requests. By the afternoon he had us handling more than five aircraft and responding to a Mayday distress call in amongst it.
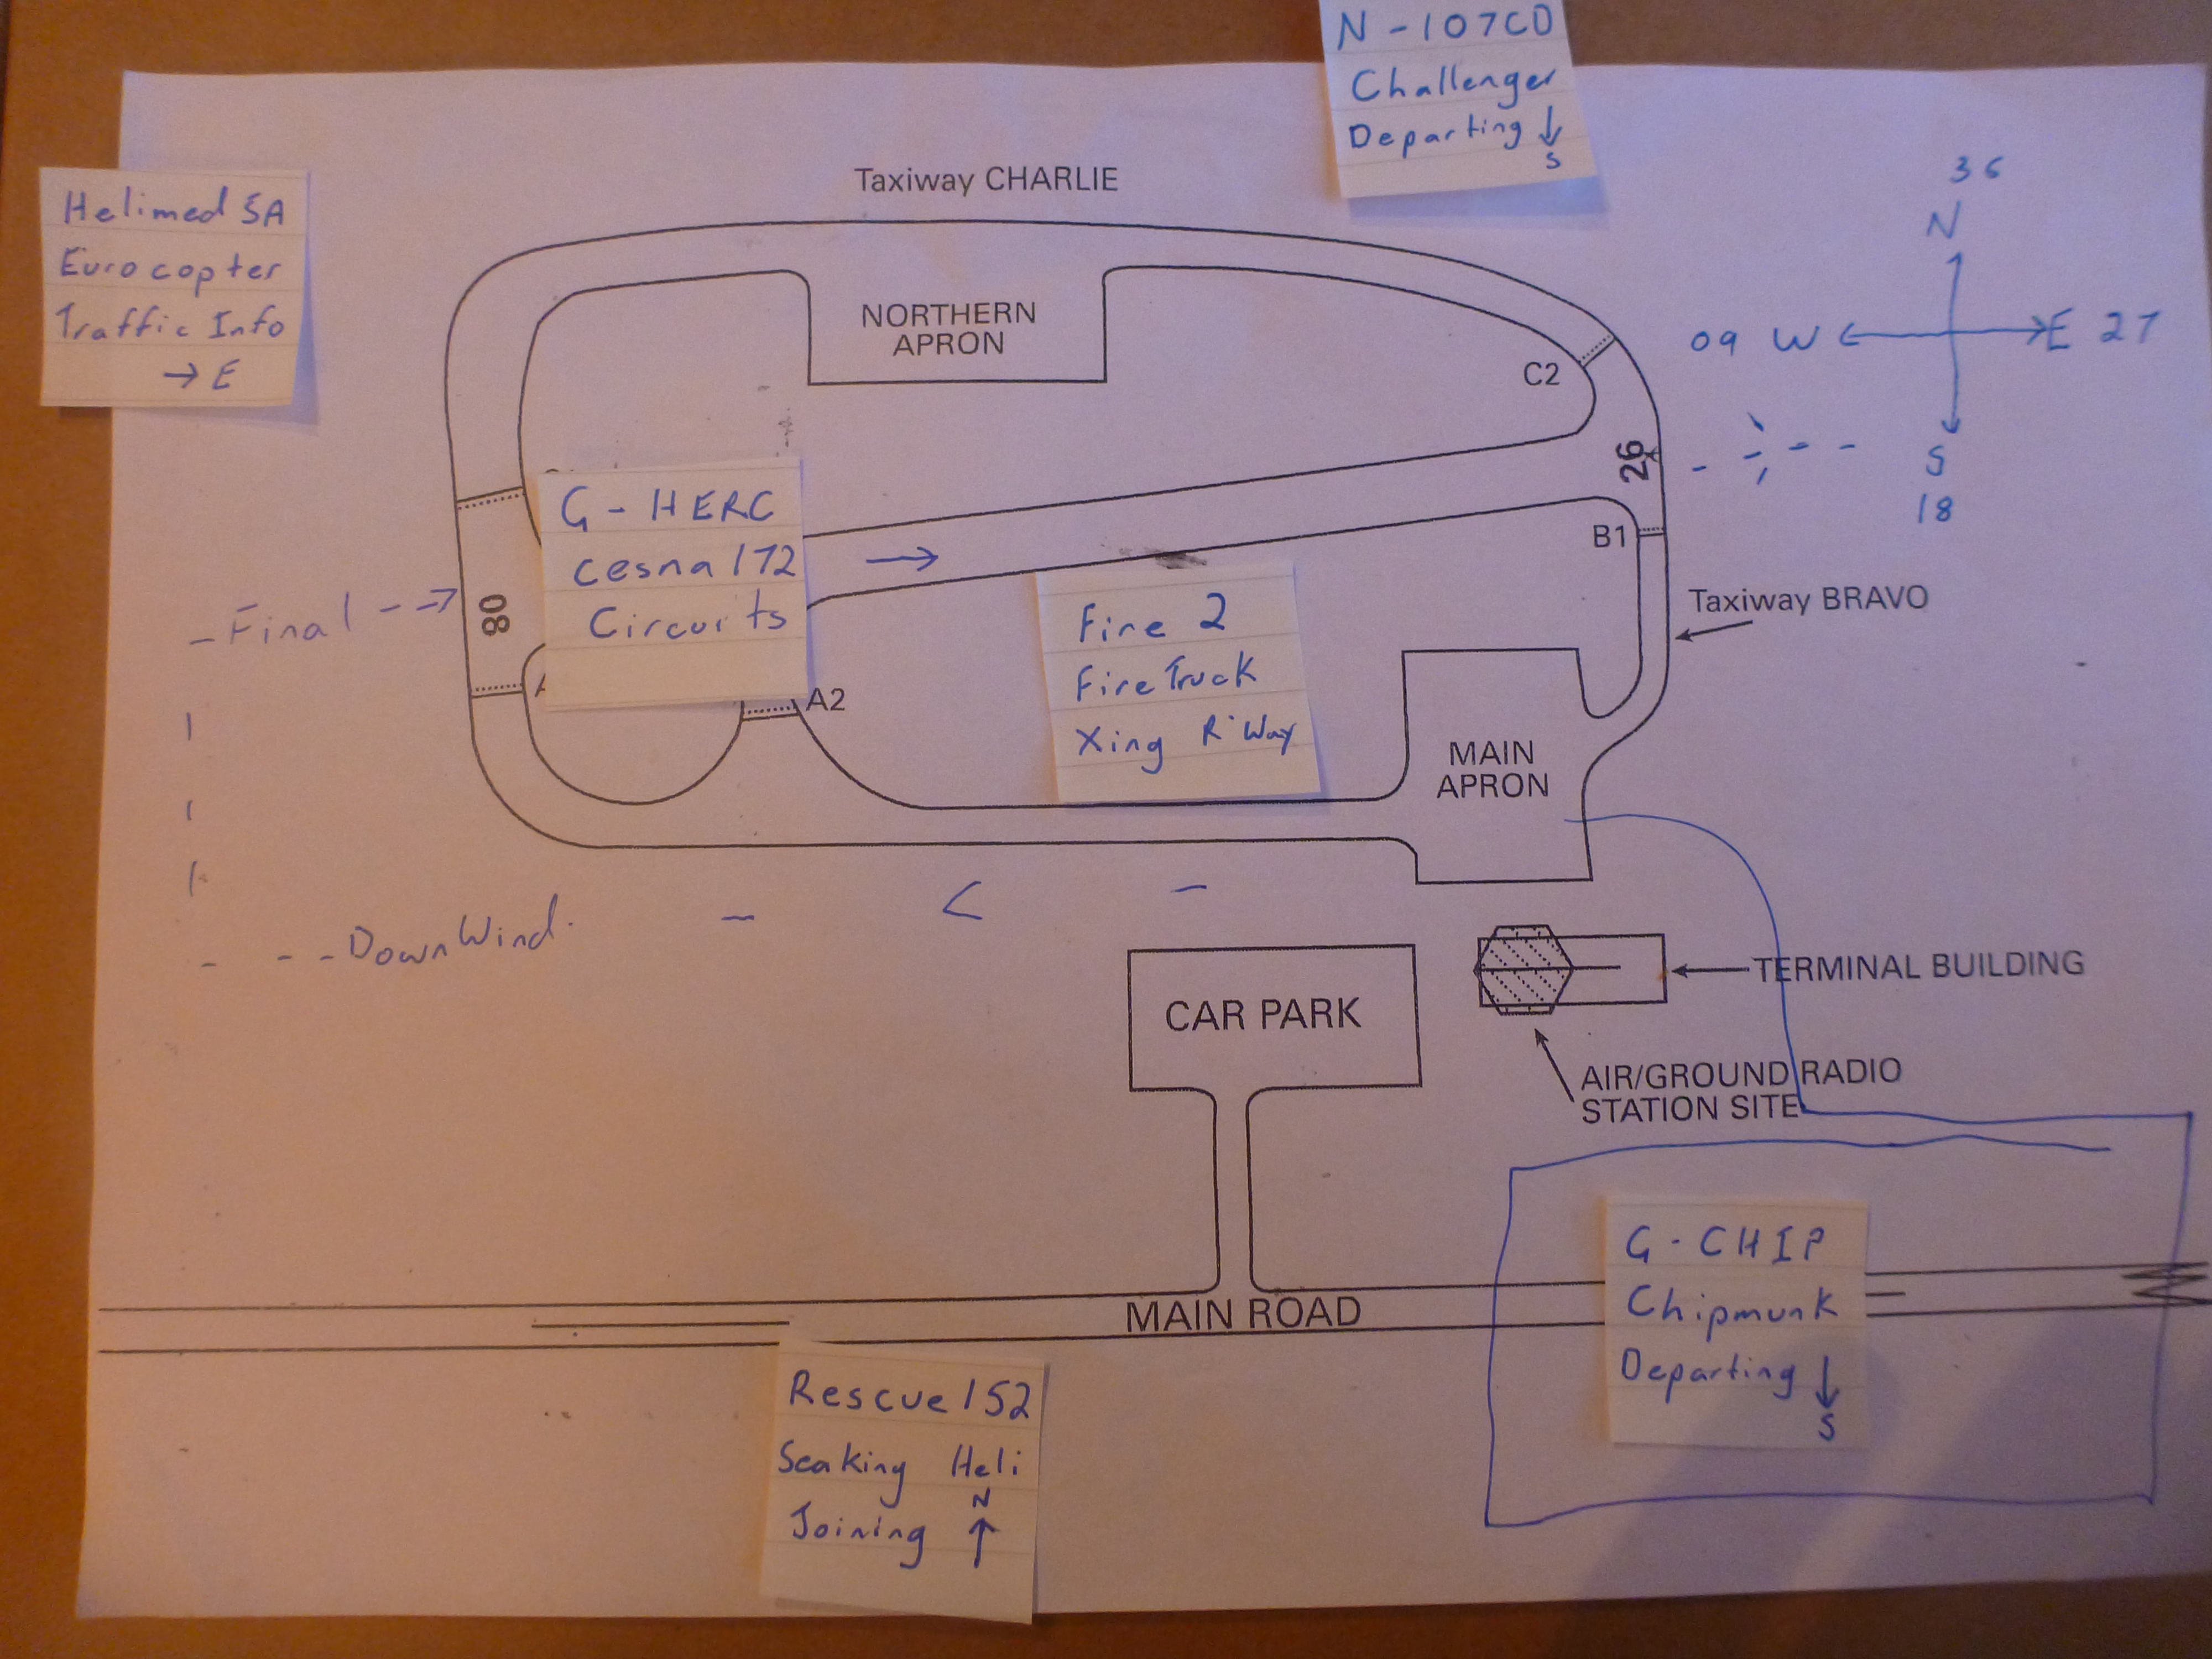
A key piece of information that radio operators pass to aircraft is information about other pertinent traffic in the vicinity. So for example if a pilot reports that they are about to depart the airfield or cross the runway it is useful to tell them if there is another aircraft on final approach to land. Similarly if an aircraft intends to join the circuit to land it is useful to make the pilot aware of any traffic ahead of them in the circuit so they can watch out for it. To do this the radio operator has to keep track of the position of all traffic in the vicinity. It was clear very quickly that I wasn’t going to be able to do this in my head so I designed a system to visually track the traffic. For each new aircraft I would write up a small card contain the aircraft callsign, type, destination and heading, and each time the aircraft reported a new position I would move the card to the appropriate position on a diagram of the airfield.
The third day was practice and refinement of our skills and techniques and an introduction to meteorology reporting(more on met later in a different post).
By Thursday we all felt ready to take our exams. The theory course at 10.00am then the practical in the afternoon. Everyone passed.